
Looking for the cutest, mess-free ways to decorate your porch and home this season? Here are over 15 easy pumpkin painting ideas that will completely transform your fall decor without the sticky mess of pumpkin guts, haha!
I’m not gonna lie to you guys, I love festive autumn decor, but standing at the kitchen counter for hours scraping out slimy pumpkin seeds is an absolute hard pass for me, lol!
Between busy schedules and trying to keep things low-maintenance, painted pumpkins are my absolute ride-or-die from October straight through Thanksgiving.
Not only do painted pumpkins last so much longer than carved ones (no rotting on your front porch after three days, praise! 🙌), but they also let you get way more creative.
Whether you want chic pastel aesthetics, spooky Halloween ghosts, moody dark florals, or super simple craft ideas you can do with the kids on a Sunday afternoon, there is something here for every vibe.
So grab your favorite acrylic paints, pour a warm mug of spiced cider, pull on your cozy oversized sweater, and let’s dive into these insanely cute no-carve pumpkin painting ideas!
What You’ll Need Before You Start Painting
Before you jump into these cute ideas, here is the quick supply list and essential cheat code tips so your paint doesn’t peel or smear off the pumpkin skin!
The Essential Supply List
Acrylic Paints or Paint Pens: Acrylic paint gives the brightest coverage, but Posca acrylic paint pens are an absolute game-changer for detail work and line art!
Sealer Spray (Matte or Glossy): A quick clear coat of Mod Podge spray or Krylon clear acrylic sealer before and after painting keeps your design from washing off in the rain.
Rubbing Alcohol or Baby Wipes: To clean off dirt and wax from the pumpkin skin so the paint actually sticks.
Foam Sponges & Flat Brushes: Foam sponge brushes are the fastest way to get smooth, line-free base coats on large pumpkins.
💡 Pro Tips for Long-Lasting Painted Pumpkins
1. Prep the Skin First!
Always wipe down your pumpkin with rubbing alcohol and let it dry completely before applying paint. Real pumpkins have natural oils and dirt that will cause your paint to bubble or peel right off if you skip this step!
2. Spray a Base Primer
If you’re using real pumpkins, spray a quick layer of clear sealer or matte primer first. It gives the slippery pumpkin skin a slightly textured grip so your acrylic paint glides on smoothly without sliding around, haha!
3. Artificial Fake Pumpkins = Zero Rot
If you want to keep your painted creations year after year, grab foam or plastic craft pumpkins from Michael’s or Amazon! They take paint like a dream and won’t attract fruit flies on your porch.
LET’S PAINT SOME PUMPKINS WORTH SHOWING OFF!
1. Pink Movie Night Popcorn Bucket
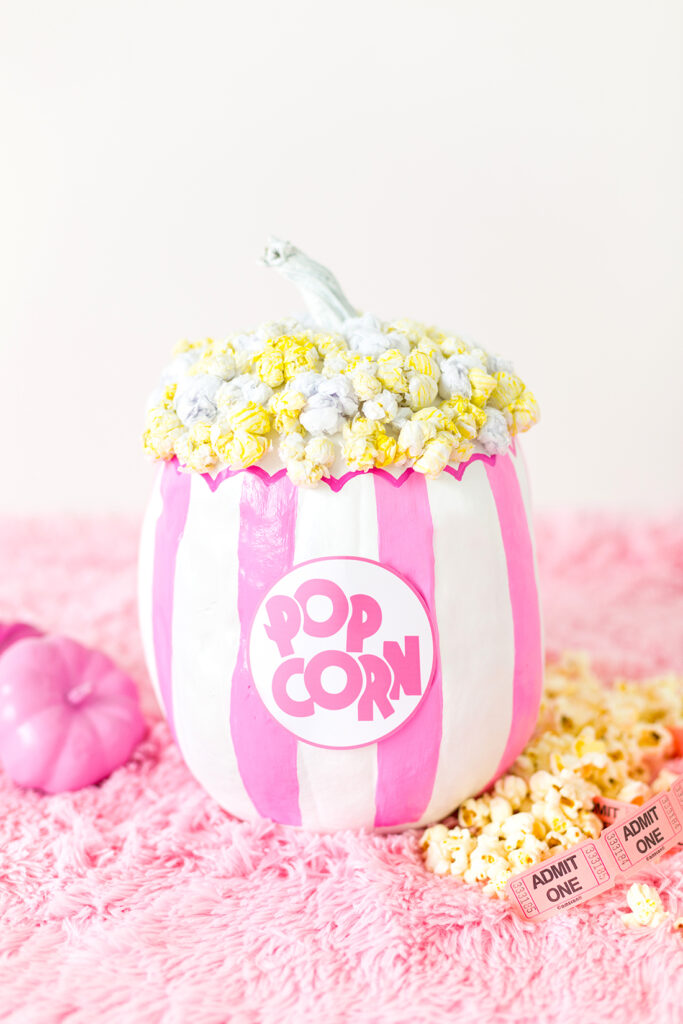
Time: 20 mins | Difficulty: Easy | Porch Safe: Covered Porch Only
How cute is this retro movie theater popcorn setup?! Paint the bottom half of your pumpkin with bright pink and white vertical stripes, and glue yellow-painted pom-poms or real popcorn around the stem to create a 3D popcorn bucket effect.
Do this design on a $5 faux foam pumpkin from Michael’s! Using real popcorn on a real pumpkin will attract squirrels and bugs to your front porch within two days!
2. Silly Frankenstein Monster
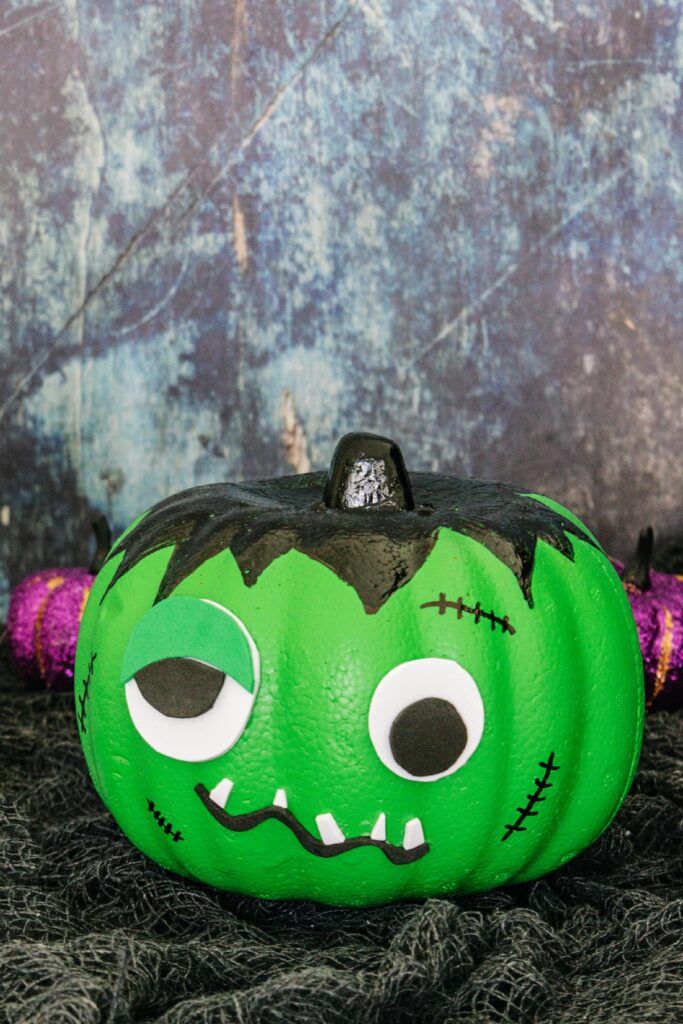
Time: 15 mins | Difficulty: Super Easy (Kid-Friendly) | Porch Safe: 100% Weatherproof
If you want a spooky-meets-cute project that kids can easily help with, this Frankenstein pumpkin is a total winner! Paint the base a vibrant lime green, then use black acrylic paint to add jagged hair around the stem and stitched scars.
Skip painting the eyes by hand! Glue on oversized felt or foam stick-on googly eyes instead. It gives Frankenstein an adorable 3D pop and saves you from painting crooked circles.
3. Drip-Painted Rainbow Turkey
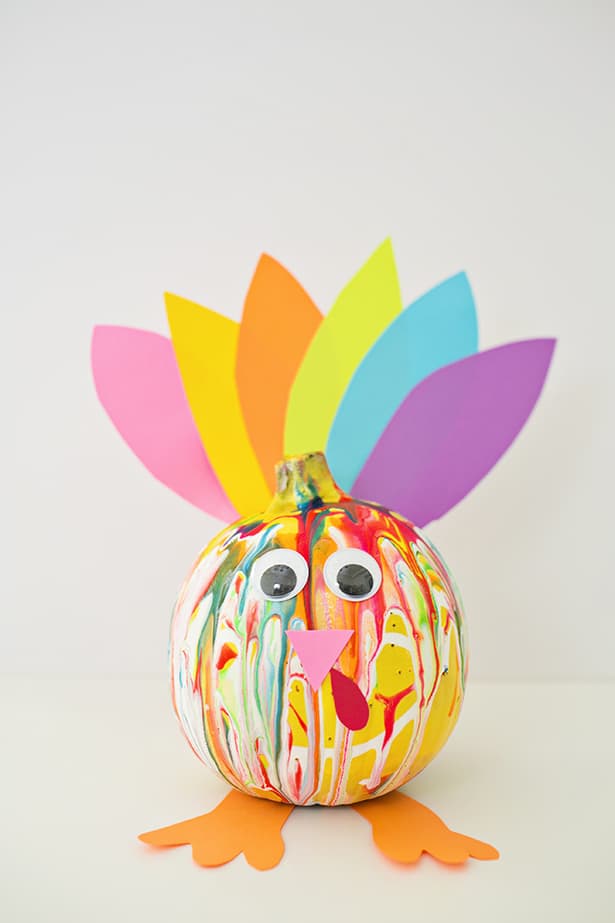
Time: 10 mins (Plus dry time) | Difficulty: Super Easy | Porch Safe: Indoor / Covered Porch
Can’t decide between Halloween and Thanksgiving decor? This colorful drip-painted turkey pumpkin bridges the gap seamlessly! Pour bright acrylic paints over the top stem and let them naturally stream down the sides.
Wipe the pumpkin skin with rubbing alcohol before pouring the paint! Real pumpkins have natural oils that cause thick acrylic drips to bubble and peel off as they dry if you skip this step.
4. Sweet Frosted Sprinkle Donuts
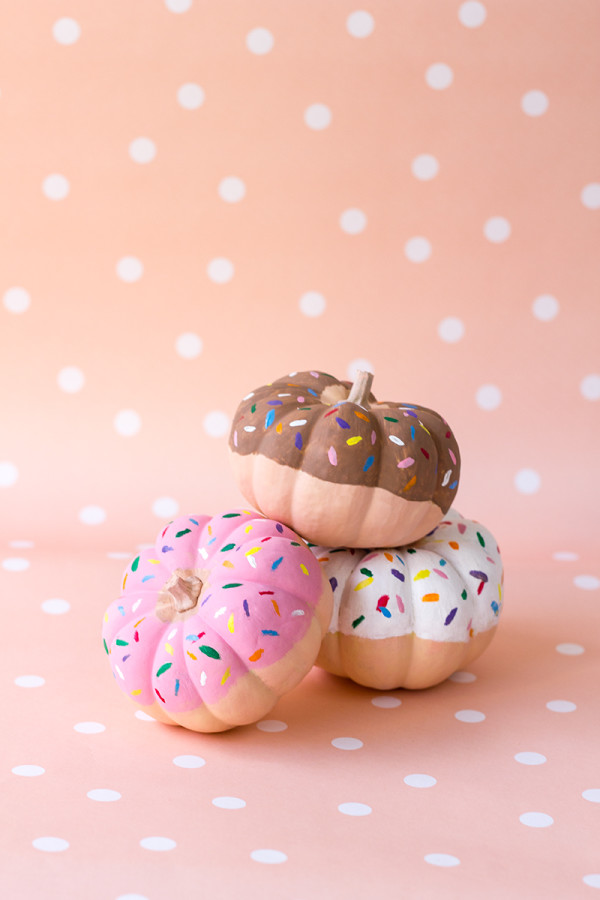
Time: 15 mins | Difficulty: Easy | Porch Safe: 100% Weatherproof
I am totally obsessed with how sweet these mini pastel donut pumpkins look! Paint the bottom half a neutral cream shade to mimic dough, then add a glossy layer of brown, pink, or white paint on top for the icing.
Use acrylic paint pens (like Posca pens) to draw on the colorful sprinkles instead of a tiny paintbrush! It gives you crisp, vibrant lines in two seconds with zero mess.
5. Trendy Pink “Chill Pill” Pumpkin
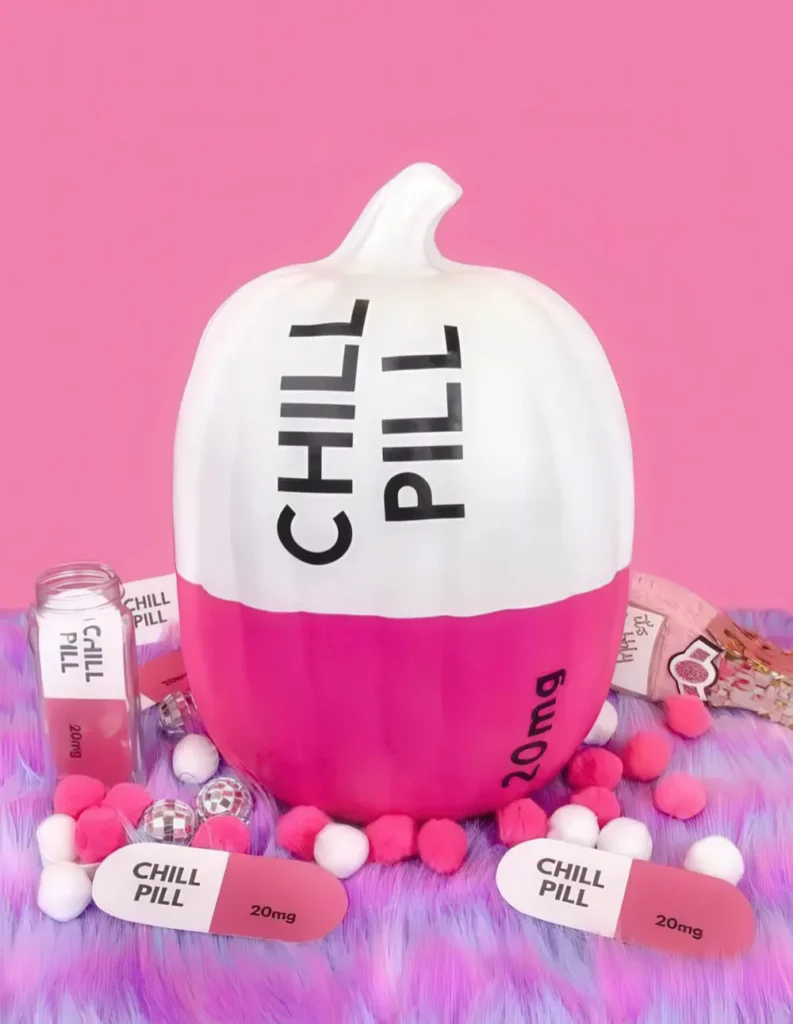
Time: 20 mins | Difficulty: Easy | Porch Safe: Covered Porch Only
How fun is this pop-art “Chill Pill” design?! Paint the top half of a tall pumpkin solid white and the bottom half a bright magenta pink, then use vinyl lettering or black paint to spell out “CHILL PILL” right across the front.
Use a strip of painter’s tape across the middle before painting your pink base! Peeling the tape off while the paint is slightly tacky gives you that razor-sharp, clean line across the center pill seam.
6. Sleeping Beauty Pumpkin
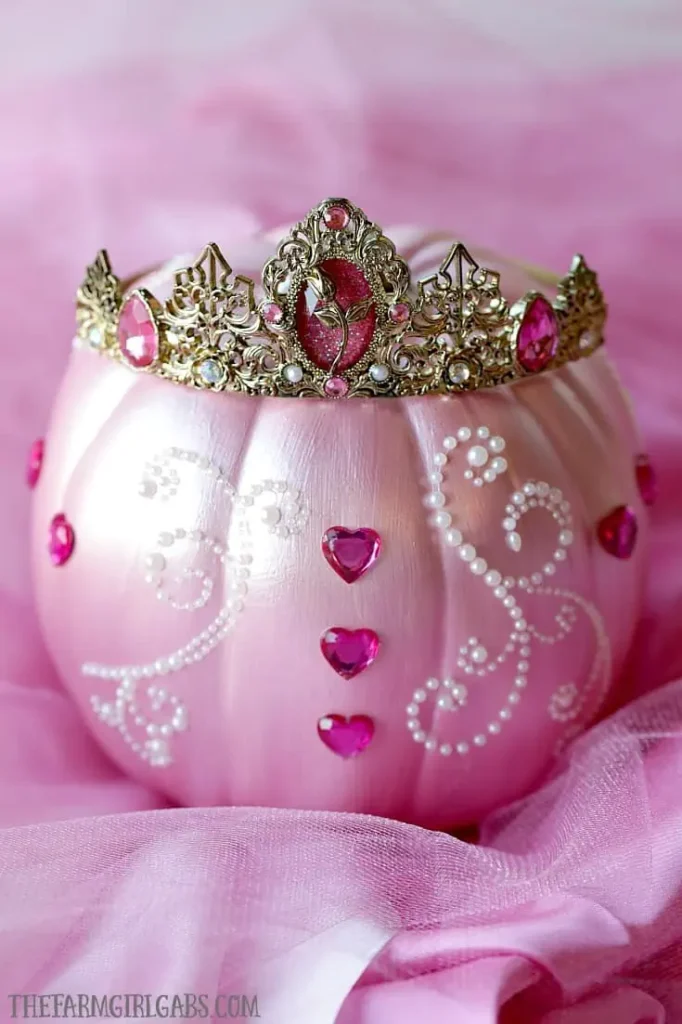
Time: 25 mins | Difficulty: Intermediate | Porch Safe: Covered Porch Only
If you have a little girl at home or just love all things ultra-feminine, this glam princess pumpkin is an absolute dream, bestie! Paint a white faux pumpkin with soft metallic pink paint, then glue a cheap costume tiara around the stem.
Use self-adhesive pearl and rhinestone sticker strips from Dollar Tree for the swirl details! You can lay down perfect pearl vines in seconds without messing around with hot glue drips.
7. Glitter Spiderweb & Sparkle Spiders
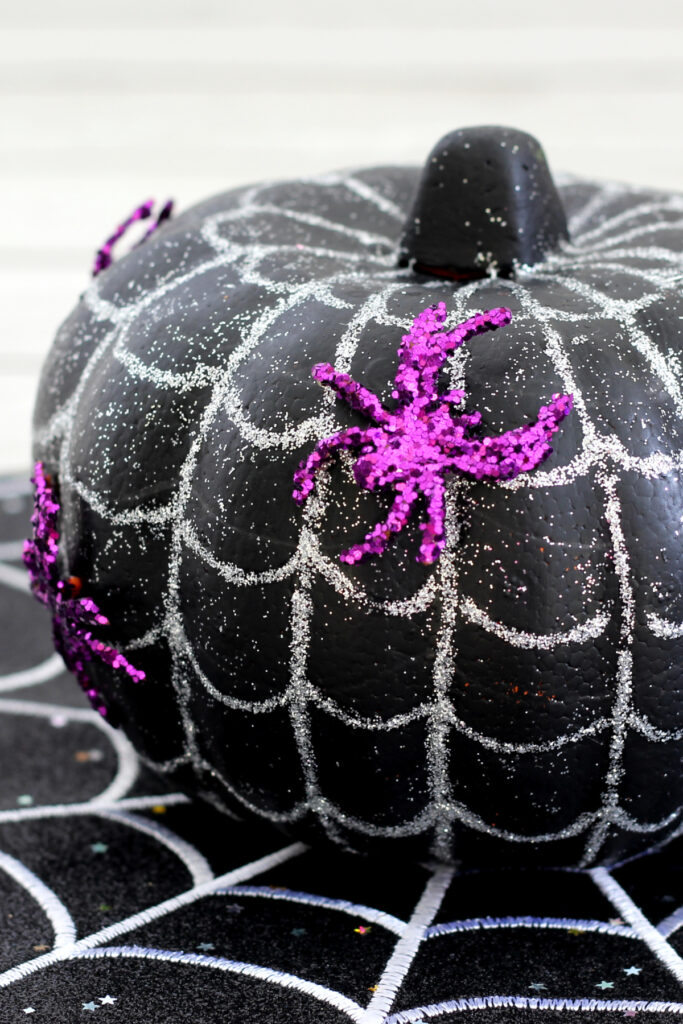
Time: 20 mins | Difficulty: Easy | Porch Safe: 100% Weatherproof
Give classic black Halloween decor an elevated glam twist with this glittery spiderweb design! Paint your pumpkin with matte black acrylic paint, then use a silver glitter glue pen to trace web arches starting from the stem down.
Press plastic glitter spiders directly into the glitter glue lines while they’re still wet! The glitter glue acts as its own adhesive as it dries, so you don’t need a hot glue gun.
8. Toy Story Pumpkin Painting DIY
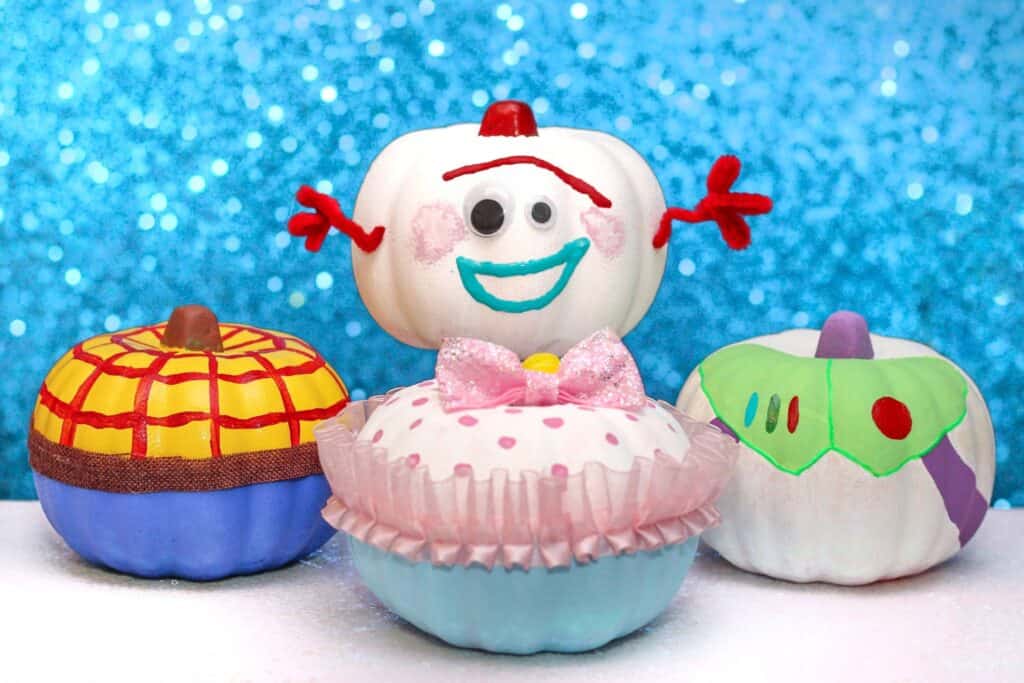
Time: 20 mins | Difficulty: Easy (Kid-Friendly) | Porch Safe: Indoor / Covered Porch
Movie character pumpkins are always a massive hit with trick-or-treaters, and this Toy Story lineup is so creative! Stack two mini white pumpkins with a wooden tooth-pick down the center to create Forky’s tall body.
Use red pipe cleaners for Forky’s arms and glue two different-sized googly eyes to immediately capture his iconic, chaotic expression!
9. Creepy Googly Eye Pumpkin
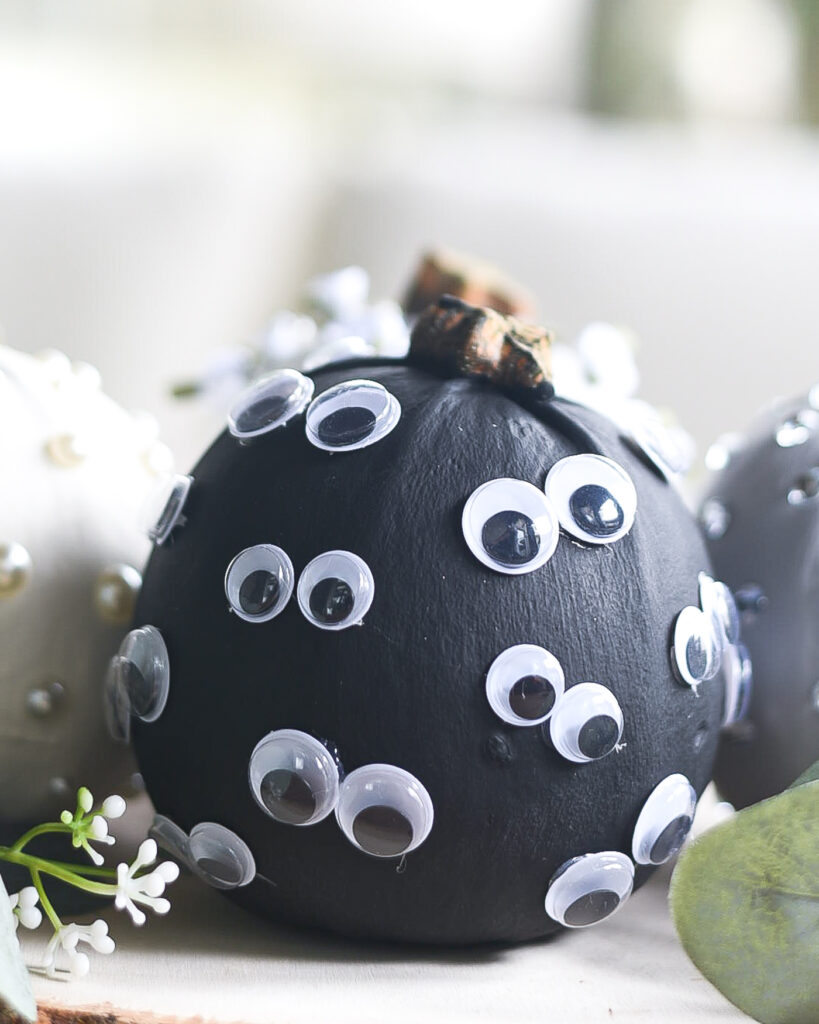
Time: 5 mins | Difficulty: Super Easy | Porch Safe: 100% Weatherproof
This is hands down the easiest 5-minute pumpkin project on the entire list! Paint a mini pumpkin in solid matte black (or chalk paint), then go crazy sticking googly eyes all over the surface.
Grab a multi-size pack of self-adhesive googly eyes from Amazon. Grouping different sizes together in pairs gives the pumpkin an instantly spooky “always watching you” vibe, lol!
10. Fingerprint Cactus Art Pumpkin
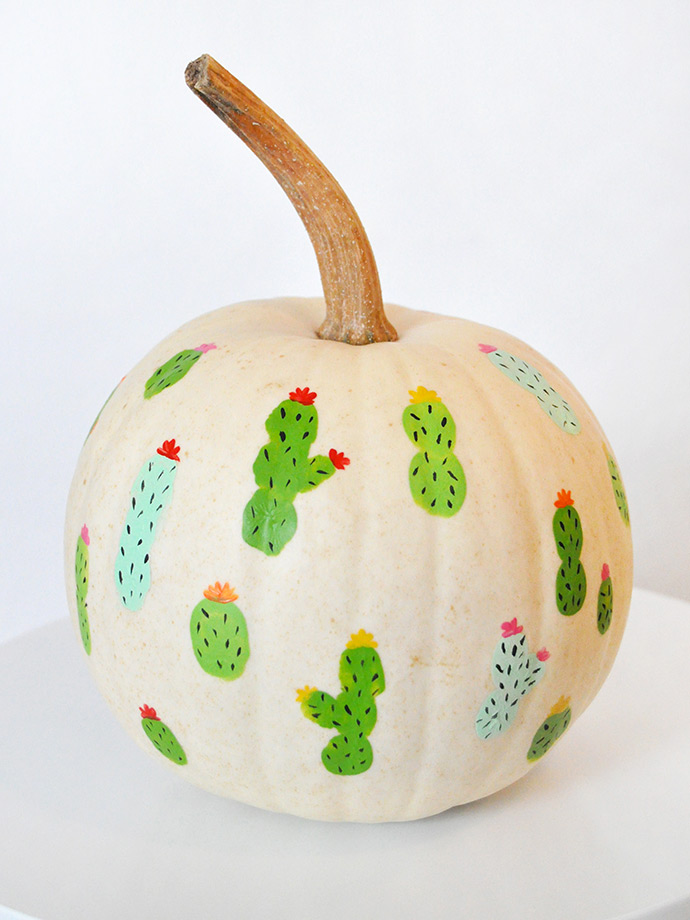
Time: 15 mins | Difficulty: Easy | Porch Safe: 100% Weatherproof
For a chic, neutral fall aesthetic that isn’t strictly Halloween, this hand-painted cactus pattern is beyond cute! Start with a natural white pumpkin, then use green paint pens to draw mini saguaro cacti all around.
Dab a tiny dot of bright pink or orange paint at the top of each cactus to create little desert blooms. It adds a pop of color that looks gorgeous on an entry console table!
11. Dexter-Inspired Paint Splatter
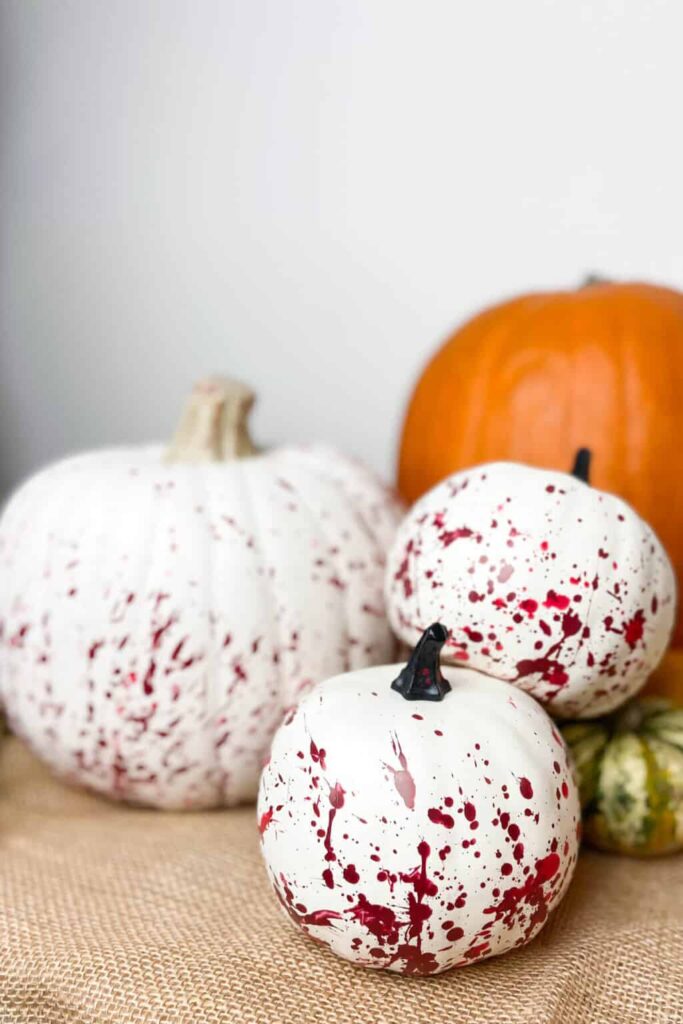
Time: 10 mins | Difficulty: Super Easy | Porch Safe: 100% Weatherproof
If you want a creepy, true-crime vibe for Halloween night, this blood-splatter pumpkin takes less than ten minutes to make! Paint your pumpkin a clean matte white first so the red really pops.
Dip an old toothbrush or stiff paintbrush into deep red acrylic paint, then flick the bristles with your thumb towards the pumpkin. It creates a realistic splatter effect without making a huge mess!
12. Retro 90s Pastel Memphis Pattern
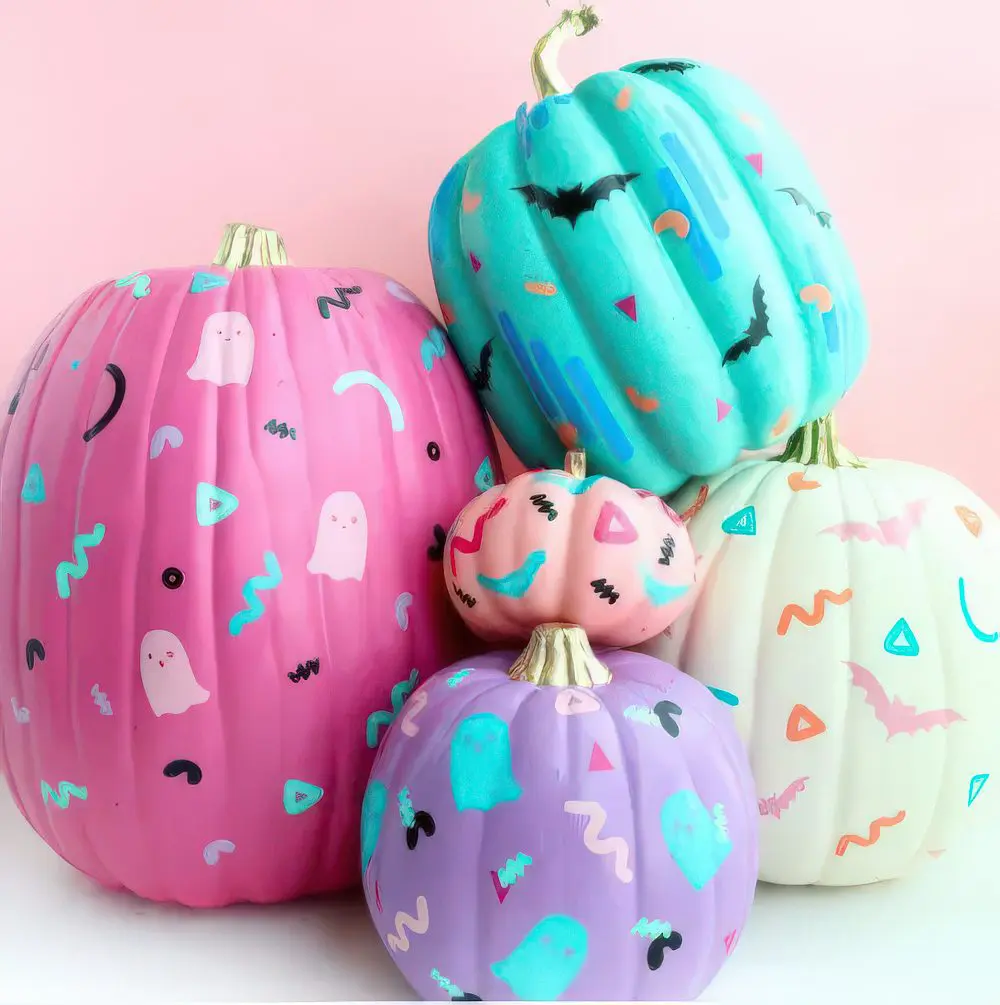
Time: 25 mins | Difficulty: Intermediate | Porch Safe: 100% Weatherproof
If you’re obsessed with pastel Halloween decor, this 90s retro Memphis pattern setup is an absolute dream! Paint a cluster of pumpkins in soft pink, teal, lavender, and mint green, then add mini white ghosts, black bats, and colorful squiggles all over.
Draw your mini ghosts and squiggles using pastel Posca paint pens instead of a paintbrush! It gives you super crisp lines on curved pumpkin ridges without any streaking or shaky edges.
13. Nostalgic Peanuts & Charlie Brown Squad
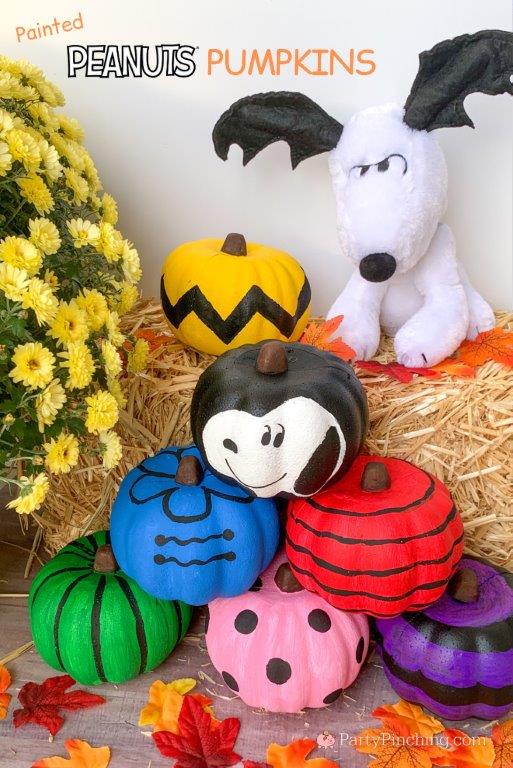
Time: 15 mins (Per pumpkin) | Difficulty: Easy | Porch Safe: 100% Weatherproof
Nothing says classic October vibes quite like It’s the Great Pumpkin, Charlie Brown! Paint mini pumpkins in bright yellow, blue, red, pink, and black, then add simple line details for Charlie Brown’s zig-zag shirt, Snoopy’s face, and the rest of the gang.
Use an ultra-fine black Sharpie or oil-based paint marker to draw Charlie Brown’s black zig-zag stripes! A marker gives you way more hand control than trying to paint straight lines on a tiny round pumpkin.
14. Bright Rainbow Heart Pumpkin
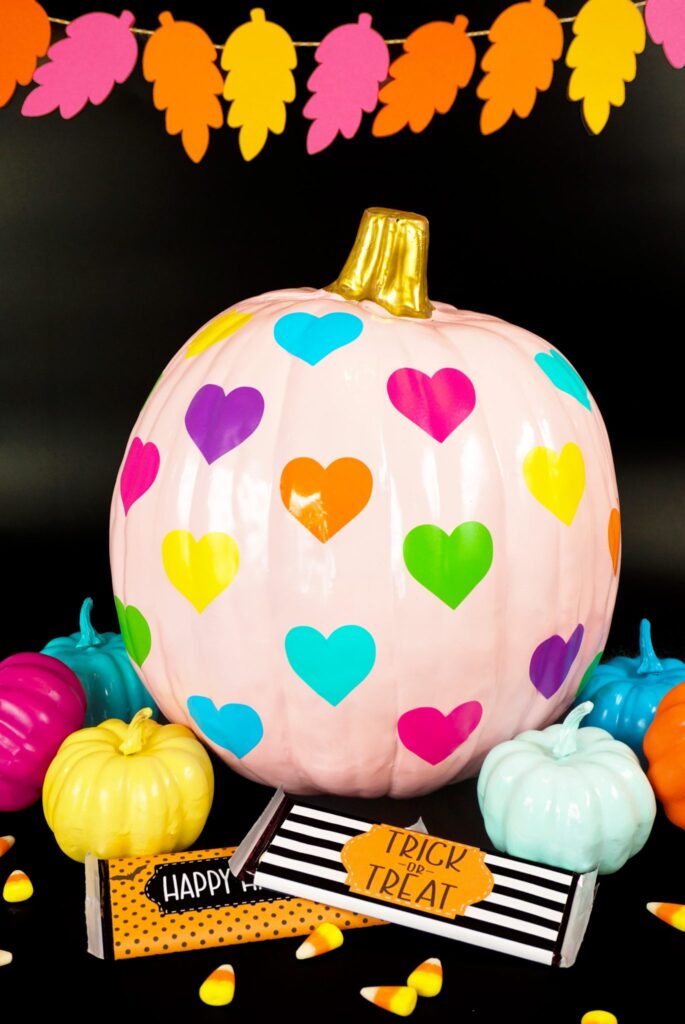
Time: 15 mins | Difficulty: Super Easy | Porch Safe: 100% Weatherproof
For a cheerful, kid-friendly look that isn’t spooky at all, this rainbow heart pumpkin is beyond cute! Give a large pumpkin a smooth coat of soft pastel pink, then paint bright vinyl-like hearts in teal, yellow, purple, and green all around.
Cut heart shapes out of sticky colorful vinyl paper (or buy pre-cut vinyl heart stickers) instead of hand-painting them! You just stick them right onto the dry pink pumpkin for a flawless, bubble-free finish.
15. Glam Rhinestone “BOO!” Witch Hat
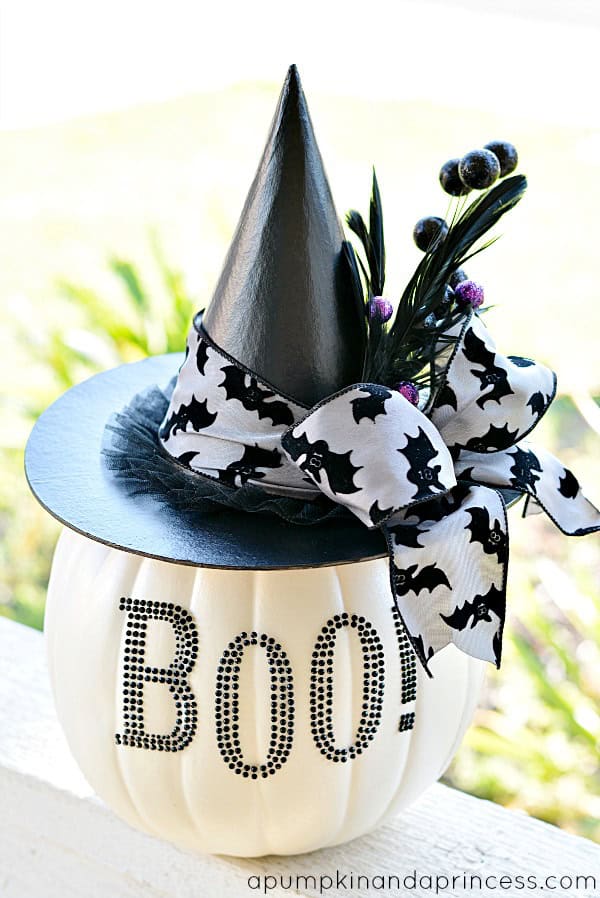
Time: 25 mins | Difficulty: Intermediate | Porch Safe: Covered Porch Only
If your fall aesthetic is all about glam black-and-white decor, this witch hat pumpkin is a total showstopper! Paint your pumpkin a smooth matte white, stick black rhinestone letters down the front to spell “BOO!”, and top with a cute miniature witch hat and bat ribbon.
Use self-adhesive rhinestone sticker sheets from the craft store for the lettering! You can cut out the letters in one piece or peel the crystal dots in rows so you don’t have to glue individual gems one by one.
16. Glitter & Glam Pumpkin Patch Craft
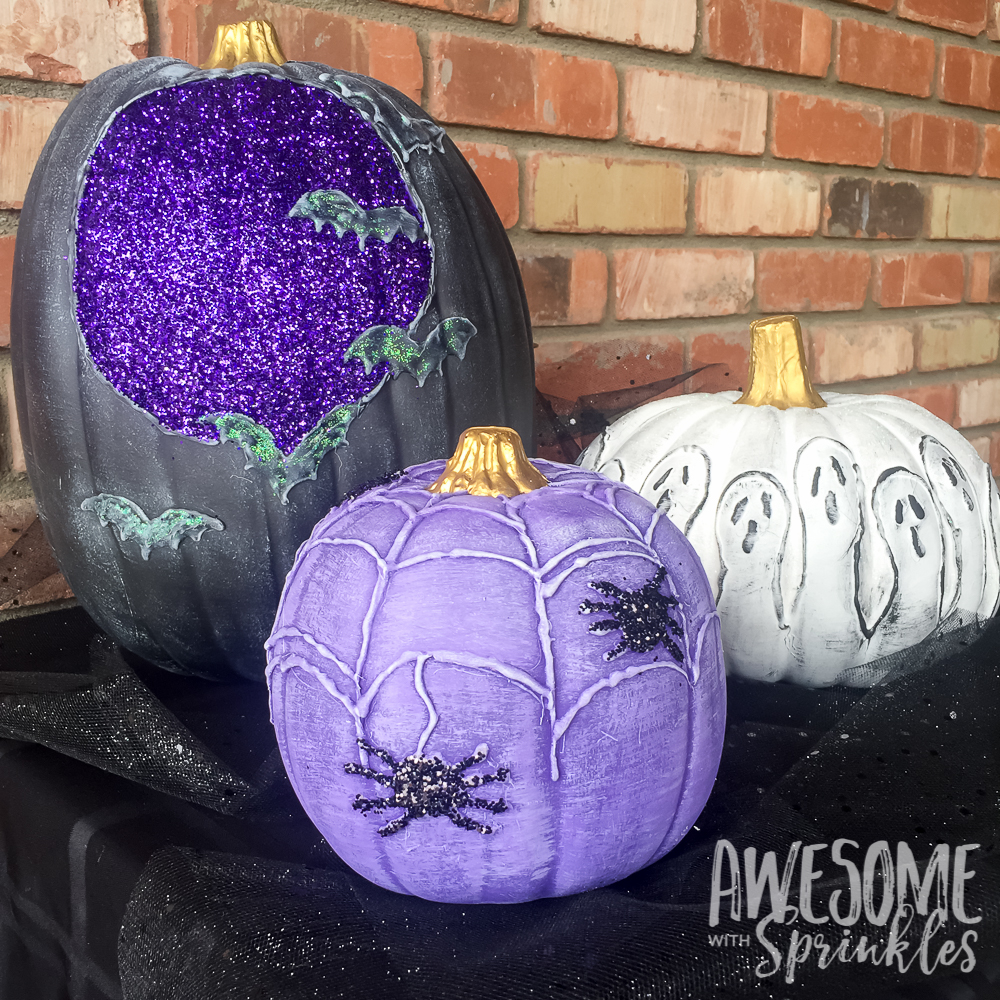
Time: 30 mins | Difficulty: Advanced | Porch Safe: Covered Porch Only
Give your front porch a magical, witchy vibe with this dramatic purple glitter moon and spiderweb pumpkin set! The large black pumpkin features a glittering purple crescent moon cutout with flying bats, paired with a lavender textured spiderweb pumpkin.
Use puff paint (dimensional fabric paint) in light lavender to trace the spiderweb lines on your purple pumpkin! The nozzle allows you to “draw” raised 3D web lines that dry dimensional without using a glue gun.
Frequently Asked Questions
What kind of paint works best on real pumpkins?
Acrylic paints and Posca paint pens are the absolute best! They dry fast, give rich coverage, and don’t crack easily like watercolors do.
How do I stop paint from peeling off my pumpkin?
Wipe your pumpkin down with rubbing alcohol first to remove dirt and natural oils! Spraying a quick base layer of clear matte sealer before painting also gives the smooth skin a grip.
How do I preserve a painted pumpkin so it doesn’t rot?
Soak your uncarved pumpkin in a tub of cold water with a tablespoon of bleach for 20 minutes before painting. It kills off surface bacteria and keeps rot away all October long!
Can painted pumpkins stay outside in the rain?
Yes, as long as you seal them! Spray your finished design with a clear outdoor acrylic sealer once the paint is dry. If your craft uses paper or felt, keep it on a covered porch instead!
WRAPPING UP: Pumpkin Painting Ideas
At the end of the day, fall decor is all about keeping things cozy, fun, and completely stress-free! Skipping the slimy pumpkin cleanup for a set of acrylic paints is easily my favorite autumn hack ever, haha.
Whether you’re making a glam rhinestone witch hat, a retro pastel ghost set, or a silly googly-eye monster with the kids, I hope these no-carve pumpkin painting ideas got your craft inspiration flowing!
Which design are you planning to paint for your front porch this year? Drop a comment below, tag me on social media so I can see your cozy setup, and don’t forget to save this post to your Pinterest board so you have it ready for craft night!
Happy painting!